Using OIDC
OIDC client using Authorization Code Flow with PKCE (code verifier + challenge); validates ID tokens (JWTs); uses Client ID, issuer/domain, ext-integration-id, connection, and organization as documented.
Requirements
- VTS app for testing
- VTS recommends using an integration page with targeting set to a test group initially.
- VTS provided Client ID, Example: izgmCHvK9Wqu3SipGdf8ldfjglsjflgjdlgjueyi
- VTS Auth0 Domain: auth.vts.com
- ext-integration-id in redirect URL (required when integration needs building, building_id, tenant, tenant_id, or any custom claims — passed as query parameter in the redirect URL)
- (Optional) connection — Auth0 connection name to route the login through a specific identity source (this is passed as a query parameter in the redirect URL)
- (Optional) organization — Auth0 organization ID to scope the login to a tenant/organization (this is passed as a query parameter in the redirect URL)
- VTS public keys: https://auth.vts.com/.well-known/jwks.json
connection and organization are newly introduced parameters and may not be supported by older builds. Forward them to the Auth0 authorize call only when they are non-null and non-empty — omit them otherwise.
If you do not have the required items above please refer to section Getting Started section
Supported Claims
Standard Claims — Returned by default:
VTS does not support separate first name and last name in app.
| Key | Description |
|---|---|
| User Info | |
| "nickname" | full name ex. John Smith |
| "given_name" | full name ex. John Smith |
| "family_name" | will always be "-" |
| "mobile" | mobile number |
| "email" | |
| "email_verified" | boolean: "true" or "false" |
Standard Claims — Returned when ext-integration-id is provided:
ext-integration-id is provided:| Key | Description |
|---|---|
| Location Info | |
| "building_id" | Unique ID for the building channel the user belongs to |
| "building" | Display Name of the building channel |
| "tenant_id" | Array of unique IDs referring to the company/tenancy the user belongs to in the building |
| "tenant" | Display Name of the company/tenancy channel the user belongs to in the building |
{
  "mobile": null,
  "tenant_id": "04ae2415-dd9f-4cb6-adce-890ac5865cfc",
  "tenant": "Cumin Kitchen",
  "building_id": "3a2f38f2-60ac-4317-8578-9710d99d799f",
  "building": "Sita Manhattan",
  "given_name": "Bob Marley",
  "family_name": "-",
  "nickname": "Bob Marley",
  "name": "[[email protected]](mailto:[email protected])",
  "picture": "<https://s.gravatar.com/avatar/f11364efcbeab43e1c9c944d20056a09?s=480&r=pg&d=https%3A%2F%2Fcdn.auth0.com%2Favatars%2Fiv.png">,
  "updated_at": "2024-09-30T20:17:30.495Z",
  "email": "[[email protected]](mailto:[email protected])",
  "email_verified": true,
  "iss": "<https://viewthespace-stg.us.auth0.com/">,
  "aud": "ers4RLxx8RPNKG1INJhz5mEHjg4f9js6",
  "iat": 1727727676,
  "exp": 1743497676,
  "sub": "auth0|903f5ae4-9f78-4ab5-88a9-f2ca15a41a86",
  "sid": "pJ0msdwEKsHu4xtuubazL7paqiTAiRlw",
  "nonce": "fasrwjM4R0pFVm5Rb2w1RUhZSTNYM0ZLN0JMNU5+R2xlZm9pTkVYLWplZA=="
}
Note: "picture" is currently not the actual link to the user's profile picture in app but a generated avatar based on name and should not be used
Custom Claims — Returned when ext-integration-id is provided:
Using custom claims will require using the redirect URL flow outlined in the docs
Any static alphanumeric value(s) can be added as custom claims today. ex
| Key | Description |
|---|---|
| "building_address" | any predefined string |
Samples libraries for React and JS
Auth0 supports libraries for OIDC workflows outlined below and could help accelerate partners looking to support this standard
- React: https://auth0.com/docs/libraries/auth0-react
- JS: https://auth0.com/docs/quickstart/spa/vanillajs
When integrating with VTS, pass ext-integration-id, connection, and organization (when present) as authorizationParams on the login/redirect call — see the #Requirements and #VTS OIDC Code Flow sections for details.
VTS OIDC Code Flow
VTS supports Authorization Code Flow with the PKCE approach.
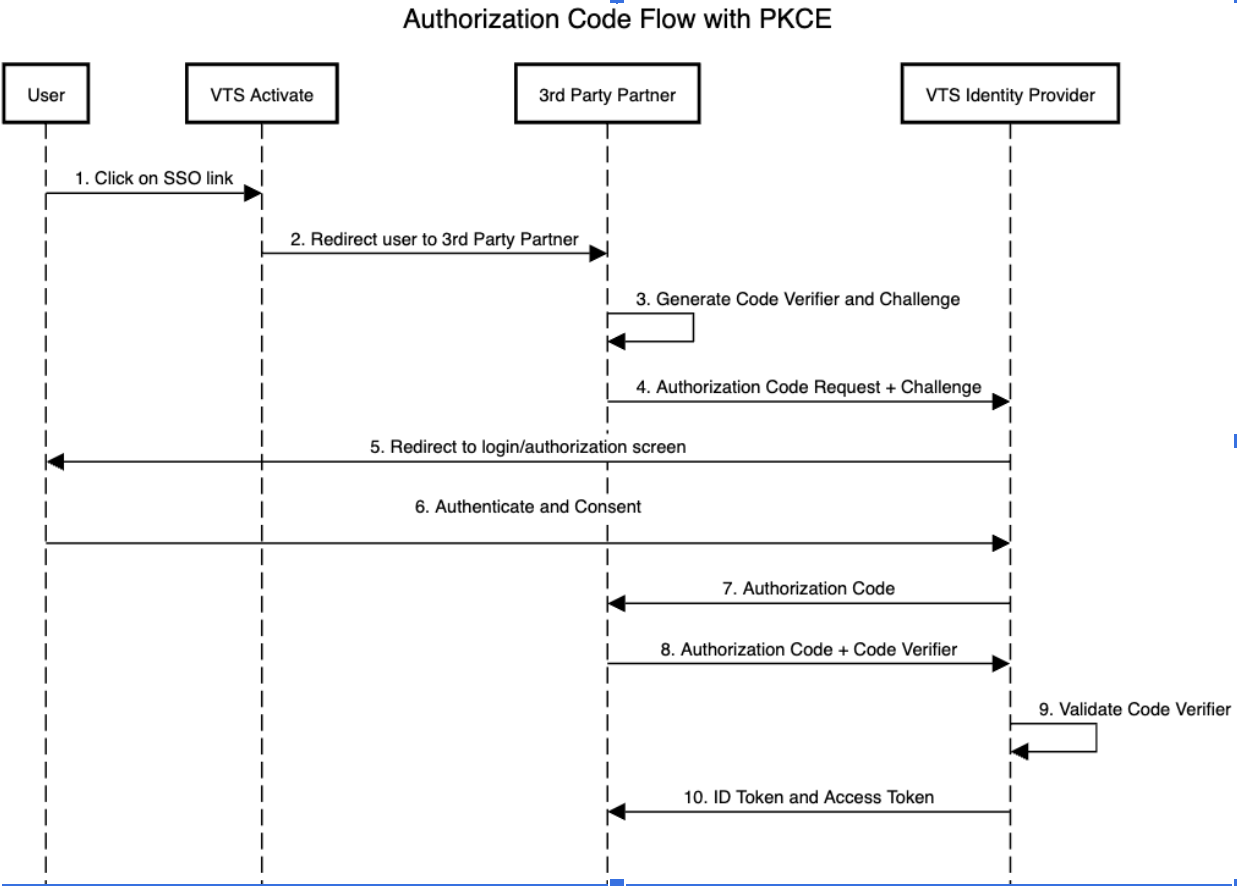
Given that the user has already signed into VTS Activate (the identity provider), the user can access service provider resources simply by navigating to a VTS Activate URL that redirects to the service provider service URL.
Steps taken by the VTS app
VTS Activate will handle the initial redirect request during steps 1 and 2.
VTS Identity Provider will verify the user's identity during steps 5 and 6 and return the JWT access token at the end of the authentication process.
Steps taken by 3rd Party
Once the VTS Activate user is redirected to a third-party Provider, the service should identify that the request came in from VTS Activate and engage this OIDC flow to authenticate the request.
Step 3. The provider creates a cryptographically random code_verifier and generates a code_challenge from this Code examples of using PCKE are available here. The verifier must be stored for later use.
Step 4. The third-party service must redirect the user to the VTS Identity provider (use authorization_endpoint in OIDC configuration shared by the VTS team) along with the following query params added to the redirectURL:
- ext-integration-id — required when your integration needs building, building_id, tenant, tenant_id, or any custom claims in the ID token
- connection — forward only if non-null and non-empty
- organization — forward only if non-null and non-empty
Note: This has to be implemented using custom logic built by the third-party. connection and organization are recommended to be forwarded whenever present; ext-integration-id is required when your integration needs building, building_id, tenant, tenant_id, or any custom claims in the ID token.
Step 7. The user is redirected to the third-party service’s callback URL, with a single-use authorization code. The callback URL must be on a pre-configured whitelist on the VTS end. Note: This must be the same callback URL configured by the third-party under Activate’s integrations.
Step 8. The third-party service sends the authorization code and the code_verifier (created in step 3) to the token_endpoint in the OIDC configuration.
Step 10. VTS Identity Provider responds with an ID token and access token. After the final step, the third-party performs the JWT token validation using the Auth0 SDK or a Third-Party Library using the VTS identity provider public keys available here.
Updated about 2 months ago